

Installing the HDD
Step 1- Gathering Proper Materials
- Remove DVR and accessory box from its protective case and place the unit in front of you with the rear facing you.
- Remove Styrofoam and plastic bag from DVR.

- Open accessory box and remove the SATA cable (usually blue or red) and the 4 Philips combo hex head hard drive screws. Then place accessory box aside. (There are usually 5 screws in the accessory box 4 hex head screws and 1 round head screw with a washer for the ground.)

Step 2 – Opening DVR
- (For this step you are going to need the #2 Phillips head Screw Driver/Screw Gun)

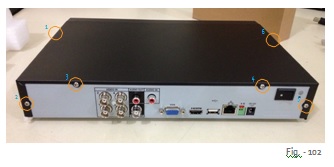
- There are 6 screws in total to open the DVR for the hard drive installation. 4 are located in the back and 1 on each side. Shown in fig. – 102
- Remove the screws with the #2 Phillips head Screw Driver/Screw Gun.
- Once finished, remove the DVR cover by lifting from the rear on the DVR first and place it out of the way.
Step 3 – Installing the Hard Drive
- (For this step you are going to need the #2 Phillips head Screw Driver/Screw Gun, hard drive, SATA cable, and 4 Philips combo hex head screws)
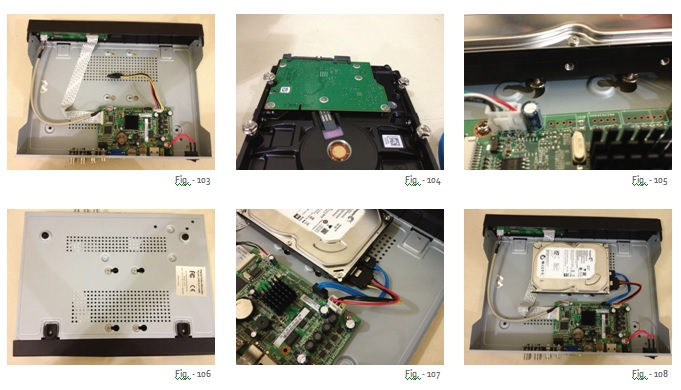
- First make sure that the Power cable is free from zip ties. (Be careful when cutting the zip tie to prevent damage from the cable) Shown in fig. – 103
- Next, take the hard drive and place it upside down (screw holes facing up).
- Take the 4 Philips combo hex head screws and screw them into the hard drive just till they catch some thread (this will make it easier when installing in the DVR). Shown in fig. – 104
- Place the hard drive, with the ports facing right, in the DVR where the 4 holes on the right side of the unit are and slide into place. Shown in fig. – 105 (If the ribbon cable that leads to the faceplate is obstructing you hard drive installation then you can carefully lift the cable from the DVR and place it on top of the hard drive)
- Holding the hard drive in place flip the DVR upside down and screw the 4 Philips combo hex head screws down with the lowest torque setting on your drill or with mild torque applied to the #2 Phillips head Screw Driver/Screw Gun. Shown in fig. – 106
- Flip the DVR right side up, with the rear of the unit facing you, and make sure the hard drive is snug. Grab the SATA cable and plug it into the DVR’s main circuit board below the hard drive. Shown in fig. – 107
- Then plug the 4 port power cable and SATA cable into the right side of the hard drive. Shown in fig. – 107
- Make sure all cables are connected properly to the hard drive. (Also check the USB and ribbon cable the leads to the faceplate) Shown in fig. – 108
Step 4 – Closing the DVR
- (For this step you are going to need the #2 Phillips head Screw Driver/Screw Gun)
- Take the DVR cover and replace it back on to the DVR. Start by hinging the cover with the front of the DVR and closing it from front to back.
- Take the 6 screws from Step – 1 and replace them back in there appropriate places. 4 on the back and 1 on each of the sides. (If you are using a Screw gun place on lowest torque setting, and using mild torque when using a Phillips head screw driver) Shown in fig. – 102
Testing the Hard Drive
Step 1- Gathering Proper Materials
- (For this step you are going to need the DVR, monitor, HDMI/VGA cable, Power cable for DVR, and mouse)
- Connect the HDMI/VGA cable to the monitor. (The cable varies on the type of monitor you are using)
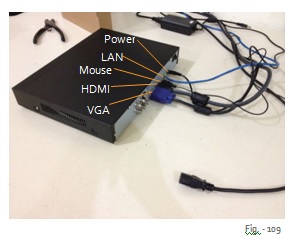
- Next connect the power, mouse, and the other end of the HDMI/VGA cables into the rear of the DVR. (Make sure you plug the DVR power cord into a 120v receptor) Shown in fig. – 109
- Turn the DVR on, if not on already, with the power switch located on top of the 12v power input. (White dot should be pushed down)
Step 2 – Testing Hard Drive
- When the unit powers up you should hear a short beep sound, if not or you hear a long beep sound after then go down to troubleshoot and follow the directions .
- **If you don’t see a set-up wizard then skip the next step.**
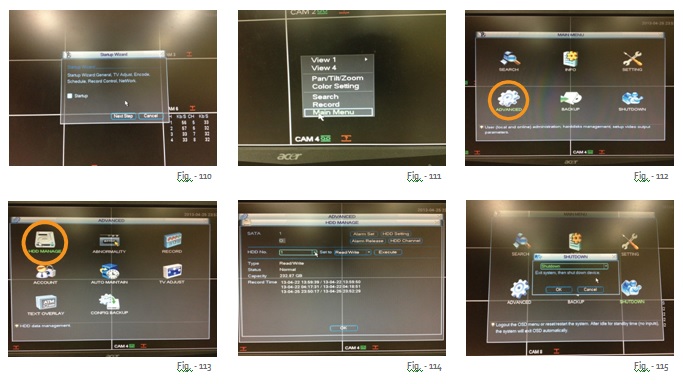
- If the set-up menu pops up then right click anywhere on the screen and select ok. Shown in fig. – 110
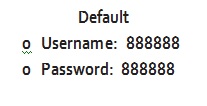
- From here right click again to pull up the drop down menu and click main menu at the bottom Shown in fig. – 111. Then a log in window will show up asking for the username and password. Enter in the info below and click ok
Step 2 – Testing Hard Drive (Continued)
- Once you get to the main menu click on Advanced, and then HDD Manage. Shown in fig. – 112 & 113
- In that menu you will see, in the middle, the words HDD No. with a 1 in the drop down menu. Below that you will see all of the hard drive information like the Type, Status, Capacity, and Record Time. If the Status shows “Normal” and the Capacity is correct then the drive is properly installed. Shown in fig. – 114
- Once that is confirmed and you want to shut the DVR down **FOLLOW THESE STEPS**
- Right click twice (one to bring you out of the HDD Manage window and one to get out of the Advanced window); that brings you to the Main Menu. Now click onto the shutdown option, click the drop down menu, select shutdown, and then click ok. Shown in fig. – 115 (This is recommended for every time you shut down the unit to prevent any data loss)
Troubleshooting
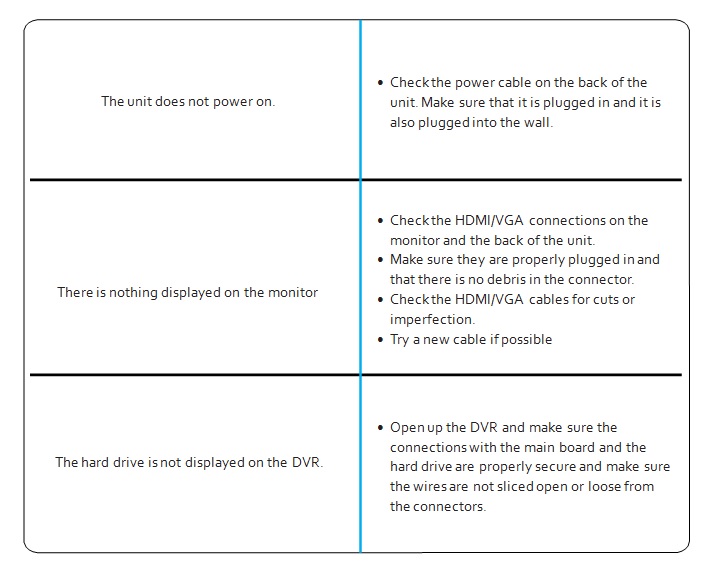
For any other problems, questions, or concerns please call our tech support line at 1-(866)-573-8878
Glossary
- DVR (Digital Recording Device) – A DVR is a device that records the cameras footage on to a hard drive and gives access to view it for later. Also it allows you to playback old footage, take motion based snap- shots or video, and remotely view cameras over a local network or the internet.
- Hard Drive – A hard drive is the storage medium for your DVR where all the cameras footage is stored.
- SATA Cable – A SATA cable is the transfer cable that allows the DVR to record to the hard drive.
- HDMI Cable – A type of cable that produces a high definition video signal for newer monitors or TV’s.
- VGA Cable – A cable that produces a video signal for general computer monitors.