The Prime Series DVR, Digital Video Recorders and Network Video Recorders are the latest addition to the Security Camera King line up. They feature the technologies of IP, Analog, and HDTVI cameras. The unit I am working with today is a TRIDVR-PRE8ME.

This unit can record resolutions of 1080P, 720P, 960H, and D1. Respectively that is 1920 X 1080, 1280 X 720, 960 X 480 for height and width of image. Since this DVR is a TRIDVR it will support 1 IP camera. The great function of the IP camera is that I can tell it to run at any resolution lower than its maximum. If storage space is a concern running at lower resolutions will allow for more playback footage.
Configuration
This DVR is so user friendly in most cases you can just connect cameras to it and go; however, a lot of us do not buy dvrs just to run at the default setup. We want the network access, remote access, emails, cell phone access. That means advanced configuration in the unit is necessary to make these features and many more work . As a support representative here at Security Camera King, a common problem during a phone call is “the date and time are not correct on my unit.” The time on your DVR is very important which is why we need to tackle this first. The biggest reason being you need to be able to find the recorded event. Without the proper time on the unit it makes finding the recording very difficult and should it need to be presented to law enforcement, it may not be able to be used as evidence.
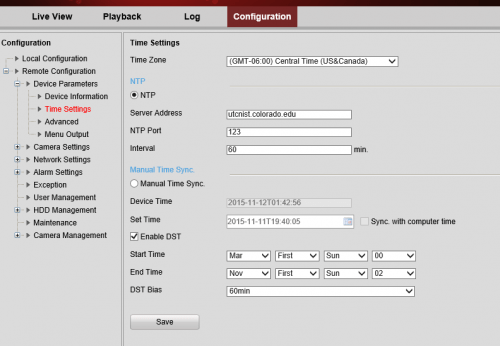
On this page in the web interface are the time zone settings. There are a lot of options and they are easy to improperly configure. The first option at the top is the time zone. I have seen in many cases that the time zone Greenwich mean time (GMT) is set outside of the local time zone. It needs to be set per your locale. Search the internet for your state or country GMT and you will find what plus or minus it should be set to. When not set properly it will update the time to the wrong time zone thereby forcing your DVR to display the wrong time.
Next is the NTP server setup. NTP stands for Network time protocol. This part allows and instructs the DVR to reach out to a NTP server on the internet to ask what time it is. The time zone option chosen is what response the NTP server will return to the DVR. This is why I cannot emphasize enough to set your TIME ZONE properly, or your DVR will never display the accurate time. The port number for NTP will always be 123.
The daylight savings time (DST) option is last. This is so your DVR will automatically changes time for DST. You just need to enter in the month, week, and day for this to take affect. After you save the configuration the DVR will automatically start updating by itself. Once this feature is configured properly it truly is set it and forget it.
Display output
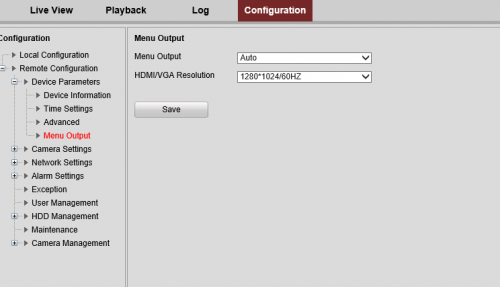
Display output settings apply to the monitor directly connected to the DVR. Another common issue is that monitors just don’t “work” anymore. It is not that the DVR or monitor does not work . . . it is a common misconception that one or the other is malfunctioning. Again, this is a configuration error, any given monitor only supports or can use specific resolutions. How you connect your monitor can also be a factor in what it can or cannot display. HDMI supports the larger resolutions and VGA supports the smaller resolutions. I have noticed that the small area of crossover is 720P. Most will support both; however, if you have first generation VGA that is not the case. The typical problem people will see when connecting the dvr to the monitor for the first time is that you just have a black screen or the monitor will read out of range. That means the output resolution from the DVR is too big in most cases for the monitor to display.
Network Settings
The network settings are where you configure your DVR to talk to your network. The number of devices and how the network is set up is determines if the default settings will work out of the box for you. In most cases something will have to be changed. Typically it is easier to make those changes on the DVR unless you have a very basic network then it might make sense to do the changes in a router. In all cases you will have to make changes in the router anyway to allow for remote access.
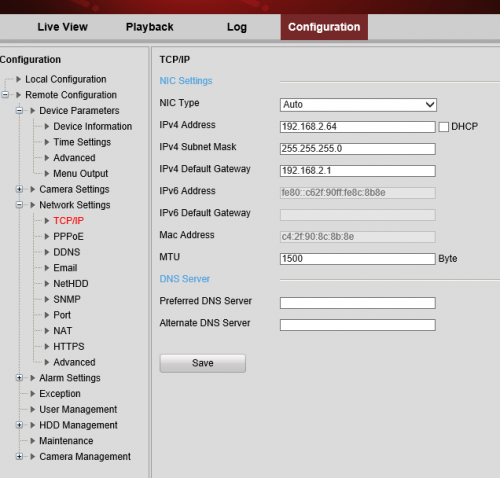
On the image above you have some basic options for the network settings. The first option is NIC TYPE. This refers to the mode in which the NIC will operate. You should leave it on Auto as it will auto detect with the router to determine the best link state. Today most equipment can use 100M at full duplex. In all cases you will want full duplex regardless of speed. Full duplex means the DVR can transmit and receive data over the network at the same time. Instead of just transmit or just receive at one time.
Second is the IPV4 address and a check box for DHCP. We always set devices static. When the DVR reboots it can change IP addresses on you which is why we don’t use DHCP. If the IP address changes unknowingly you will likely lose remote access when it does. The IP address needs to match your current network scheme. If you do not know what it is you can set the DVR to DHCP and the router will assign it an IP address and then you can switch back to static so it does not change again.
Third is the Subnet Mask. What that number does is define how many devices can connect in a network. Typically you would not change this unless you are in a large network. Then you would consult the network administrator to get the proper information.
Fourth is the Default Gateway. That is your router’s internal IP address or the address facing the inside of that network. Typically always on the first IP of the subnet. 192.168.1.1 if its a class C. An example of a class A is 10.1.10.1. That is also what a typical Comcast modem router will use by default.
The IPV6 address is not something typically used yet on internal networks but its usage is expanding greatly over the internet. MTU stand for maximum transmission unit which is 1500 bytes. That is the standard size over most networks. It can be increased but your routing equipment must be configured to use a different size first.
I have given you the basics of some important features on your PRIME series DVR and more advanced features will come in this series of informational articles.