
A lot of Government agencies are utilizing Solar Energy to power their equipment that could not be powered in any other way than solar power. Maybe the reason is the equipment is in a remote area or for the efficiency and greener energy.
One reason that you would use Solar Power would be it is renewable energy. Clean Energy does not depend on the grid. If there is a storm, this Solar Power Camera system will still operate. Solar Energy has tax incentives. The Federal Government offers tax incentives for those who install these kinds of systems in their homes and businesses. Not only can you power your Surveillance equipment, you can also power a large amount of devices in your home and business.
Let’s go ahead and cover the basic math that you can utilize as a guideline
(Current draw x 24 hours) / Peak hours of sunlight = Amperage required
Current Draw : The amount of current (amps) consumed by a device in an electrical circuit.
In a Solar System, every milliamp of current that has been conserved can save a lot of money in the long run. You have to think about the total current draw of any application so that you can minimize total draw where possible especially with surveillance equipment.
Sunlight Peak Hours: Refers to “Solar Noon” which is when the sun transits the local meridian and it is highest in the sky. Depending on your location in the hemisphere and the time of year is the amount of hours you will get, usually people receive from 3 to 5 hours of direct sunlight. It is the reason why Solar Power Systems are very popular in areas such as Arizona, Texas, Florida and other southern states.
Amps Required for your system : A Solar Panel is designed to absorb the sun’s rays as a source of energy for generating electricity or heating a charge controller. A special battery is used to store the power. This battery is designed to withstand the charging cycle as this battery will discharge and charge many times. The (DOD) number on a battery identifies how many times a battery can be run all the way down to empty before it is unusable. Also, the battery has to be 10 times the size so that the Solar Panels do not overcharge the battery rendering it unusable. Standard Vehicle Batteries are not ideal for this task. A deep cycle marine or trolling motor battery is acceptable for this type of use.
When considering a Solar System some key points have to be taken into consideration.
Example :
Mr. James needs an installation in his property in Arizona. The front gate does not have any power source whatsoever and it is about 1,000 feet from any power source. In this System we will be using an IPOB-EL1MPIR50 and a TP Loco M5 to connect this IP Camera to the existing network .
What is the total current that this system draws?
We need to determine the total current draw for this type of system. So we would add the total draw for both devices. The IPOB-EL1MPIR50 draws 4w = 4000mA and the Tp Loco M5 draws 5.5W=5500mA .
Device (1) mA = Device (2) mA = Total mA
4000mA + 5500mA = 9500mA
What is the amperage needed to run this type of system?
To determine the total amperage we first must calculate the amp hours (Ah) required per day so we must multiply the total current draw by the total hours of one day which is 24 hours.
Total Current Draw X Total Hours of a Day = Amps per Hour
9500mA / 1,000 = 9.5A
9.5A X 24hr = 228Ah
How many hours of sunlight does this system receives?
Zone 1 = 6.0hrs Zone 2 = 5.5 hrs
Zone 3 = 5.0 hrs Zone 4 = 4.5 hrs
Zone 5 = 4.2 hrs Zone 6 = 3.5 hrs
According to my location in Florida,we know that we get about 4.1 hours of direct sunlight. So we would divide the Ah by the average hours of sunlight that this location receives.
Amps Per Hour/Total Hours of Sunlight = Total Amps
228Ah / 4.1 = 55.6A
How can you determine the Solar Panel Watts
We need to determine the size of the panel and wattage needed to operate this camera and the wireless access point. Solar panels are are rated in Watts at 17 volts. To determine the watts lets go ahead and multiply 55.6A times 17.
total current draw X volts in one Solar Panel = Total Watts
5.56A X 17 = 945.2W
In this example we need a Solar Panel that can produce a total of 945.2W
What size of battery do we need for this Application?
Lets say we need to provide at least 1-2 days of reserve. Batteries are measured in amps. Since we already know our total current draw for this system we multiply 9500mA by 48 hours.
Total Current Draw X 48 hours = Battery amperage needed.
9500mA/1,000 = 9.5A
9.5mA X 48 hours = 456Ah
The battery required for this system would be 456Ah a typical ‘deep cycle marine’ battery is between 60 and 80 amp hours.
Utilizing Solar Energy to power equipment such as a Surveillance System we first need to calculate everything to ensure that we have enough power and reliability to support the system being installed.
How to Install Solar Panels
Before you install any Solar Panels make sure you are cleared legally, some communities are not comfortable with Solar Panels being installed and others require a special permit. Location must be either pointing East or West wherever it will receive the most sunlight.
Let’s figure your latitude tilt. If your location is below twenty-five degrees latitude, your solar panels should be tilted towards the sun in the amount of latitude number. If the location is at 25 degrees latitude, you will have to tilt your panels by 25 degrees. After 25 latitude, add five degrees for each additional five degrees of latitude up to 40 degrees. ( 35 lat = 50 tilt and 30 lat = 40 tilt) At 40 degrees latitude,add 20 degrees of tilt to your latitude number. (55 lat = 75 tilt) Write down this on your notes. Lets assume these panels are being installed in a pole, in this case you will need a side pole mount. These are designed to hold about 1-4 modules and are mounted to the pole using U-Bolts. Some racks can accommodate different sized poles and are adjustable from 15-65 degrees. The best ones are the ones that will adjust in 10-degree increments.
After mounting the Solar Panels we will go ahead with our electrical connections.
If you need to make an Array of Solar Panels because your Project requires more output from the Solar Panels it can be tedious and very time consuming all depending on your wire termination. Preparing all your tools and planning what type of termination is essential.
- Cut Wire to length make sure they will travel from one panel to another, make sure they will have extra length for any termination it is better to have more than to have less to work with.
- Strip ¼ inch of the insulation from the cable end that will connect to your panel.
- Crimp your connector to your wire if you are going to utilize a screw on contact or a multi connector.
- Apply Solder to all terminals in your plates, by touching the plate with your iron then touching the solder to the plate, Not the iron. Do this to all the panels in your array at the same time.
- You can either solder bare wire to the solar panel terminal on all your plates or just crimp the contacts. I prefer the Solder method.
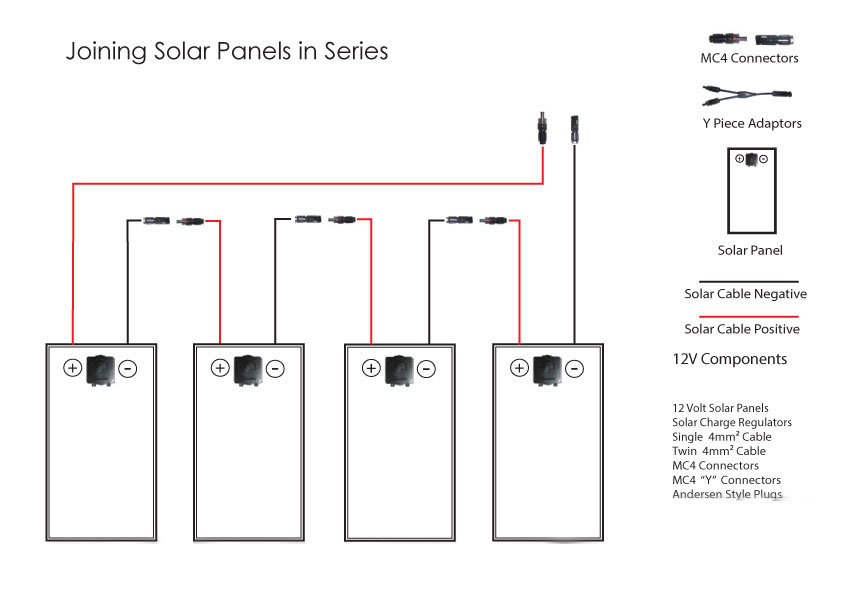
- Connect your positive (+) lead from the first panel to the negative (-) lead on your other panel in your array .
- Connect your Negative (-) lead from the second panel to the positive (+) lead on your other panel in your array .
- Repeat this step throughout your system.
- Keep any wires away from each other to avoid any shorting.

Parallel Wiring:
- Connect your positive (+) lead from the first panel to the positive (+) lead on your other panel and continue throughout your entire array.
- Connect your negative (-) lead from the first panel to the Negative (-) lead on your other panel and continue throughout your entire array.
- Use conduit in your entire system . Use zip-ties and electrical lacing tape to keep all conductors together this will prevent any wire damage.
Final Connections
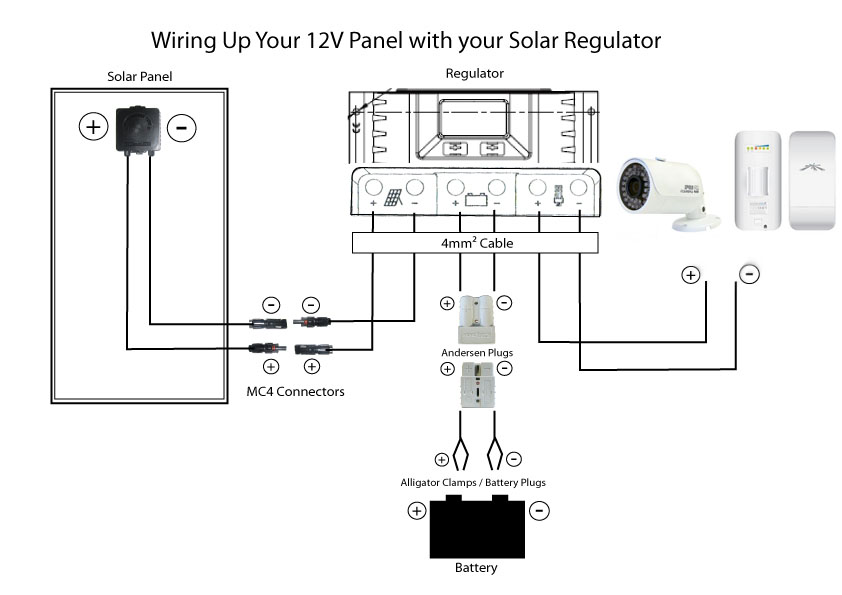
Connect your Solar panels to the Regulator input (- +) then connect your batteries (- +) last check your connections and voltage output ,make sure there is no issues with your voltage then finish your connections . VOILA! Free Power.
Now you will need another of our Tp-Loco M5 at your base location to connect this camera to your existing network, it also has to be in line of sight. You can do this same setup with any of our items just make sure your calculations are correct before purchasing or installing anything. You can purchase any of our products at SecurityCameraKing.com. We will soon have some pre-built packages for this kind of system.
Final Product
