The Benefits of Security Camera OSD Menus
A lot of questions come up when you are searching for the perfect security camera system to protect your home or business. “What kind of cameras should I get?”, “What are the best security cameras for my home?”, “What are the differences between your cameras?” These are all questions you may have asked one time or another when choosing cameras for your new surveillance system.
There are many different kinds of cameras which are usually set apart by the many different types of features and hardware available on the market today. Some of the more popular security cameras types include fixed lens cameras, varifocal cameras, pan tilt zoom (PTZ) cameras, wireless cameras, dome and bullet cameras, hidden cameras, and 360 cameras. All of these different camera types can come with or without an OSD.
OSD stands for On-Screen Display. It is an integrated on-screen menu that can be accessed within the camera to change its functions that effect how the camera processes an image. Static cameras without an OSD is more-so a camera which is just a plug and play camera. You can install these cameras and once they’re plugged in, you’re done setting it up. However, if you’re pointing this camera at a window or in an area with lighting that causes issues with how the camera sees, this will be an issue and can render the camera useless. This is where an OSD comes in handy. It’s a group of settings that you can change within the camera’s chipsets to fix many of these types of issues. Once you access a cameras OSD menu you can change functions such as Exposure, ACG, Iris Levels, Shutter Speed, White Balance, Back Light Compensation, and many more.
Example of an OSD menu on a Security Camera:
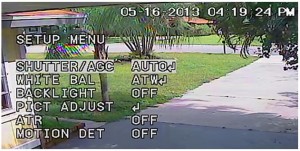
Nowadays, just about every security camera dealer will offer cameras which come integrated with an OSD. The DSP (Digital Signal Processor) that’s included inside of the camera will determine what type of settings you will have the ability to change. The DSP is a chip inside the camera which takes in all of the information coming from the CCD chip and puts it into video frames. The DSP will also process these functions and the type of DSP in a camera makes a huge difference in the quality of images you will see the camera producing.
Signal processing in security cameras come in multiple brands and versions. One of the better ones that we offer on our security cameras was created by Sony. The Effio series signal processor produces high resolution and color reproduction in security cameras and has pretty much turned into the standard when it comes to DSP’s which provide OSD capability. Effio stands for “Enhanced Features and Fine Image Processor.” A few different versions of the Effio chip set include “Effio”, “Effio-P”, “Effio-S”, and Enhanced “Effio-E”. Each version of Effio will provide you with a different set of features to allow for a various range of applications which your security cameras can be installed in.
Here are some of the settings you will be able to access with the Effio chipset along with some information on what they are capable of enhancing:
A. ATR
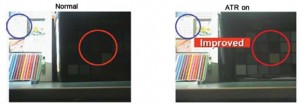
ATR stands for Adaptive Tone Reproduction. This function will give you the ability to compensate and improve the contrast of items which have been lost in situations where you have a really bright area in the picture along with an
extremely dark area. What happens is that the camera will get confused trying to compensate for both areas and ATR was created to be able to handle both. With ATR enabled, the area’s which are blown out in contrast by too much light will become a bit lower in contrast and brightness so that the image is recognizable. The other area of the picture that is too dark will become a bit brighter so that you can see better detail in anything that was originally too dark to see. This can become incredibly useful in situations where you have a camera pointed at a window or a door and the sunlight coming in blocks you from being able to see anything else in the room.
Example of ATR in use:
B. DNR
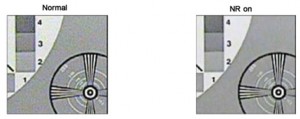
DNR is an acronym for Digital Noise Reduction. Image noise is the grainy specks that you’ll notice in some video cameras. This is usually created by some sort of interference in the video signal. A few things that can cause this type of noise are low light, heat, power interference, and even device algorithms. Enabling DNR will remove noise from your image by applying a filter that’ll make your video appear clearer and can even reduce the size of your video file.
A 2D Noise Reduction filter will help reduce the noise found in video because of low lighting. However, sometimes this filter can be confused by motion in your video which will create blurry trails on anything moving.
A 3D filter has the advantage of being able to reduce the noise in video without too much motion as well as video that does have moving objects in the image.
Example of Digital Noise Reduction:
C. Privacy Mask
Privacy Masking is a great feature to block out certain things that you don’t want showing up in your video. There are some situations where you do not want an area to be recorded or viewed when accessing your security system and even if your Digital Video Recorder (DVR) doesn’t have the ability to add a privacy mask, the OSD in some cameras will have that feature. This can be useful when you have a camera pointed in the direction of a bathroom. With Privacy Mask enabled, you will be able to set a block over the door which will be blacked out in case someone opens the door, no one will be able to view inside of the bathroom through the masking. Another situation where privacy masking comes in handy is at a bank ATM. You will be able to set a mask over the buttons so that
the person who is viewing the surveillance cameras will not have the ability to see your pin code as you type it into the keypad. If you have a security system around your house, a neighbor may ask that you do not have video of his home on your system.
You can create a mask to block out their whole house. Of course, there are many other situations in which this feature may become useful to you. Each application is different. Some cameras have the ability to utilize polygonal privacy masking as opposed to standard masking. This advanced type of masking will allow you to create perspective masking instead of just drawing squares over an image. The polygon mask definitely allows for a bit more flexibility in what you’re blocking out.
Example of Privacy Masking:

D. HLC
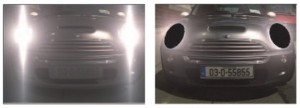
Another cool feature of the security camera OSD is the HLC feature. HLC is an acronym for Head Light Compensation. This setting is also known as “Eclipsing” and helps improve images that are effected by really strong front lighting. HLC works by painting over any part of the image that’s overexposed with black so that the other parts of the video can be seen clearly. This is mainly used for areas where cars that have their headlights or break lights pointing at the camera as they are passing through. Being able to see behind a bright light source will the camera the ability to see license plates better and even the make and model of the car. Without headlight compensation, the bright light will create such a large area of overexposure that when the camera tries to compensate for the brightness, it’ll block out the clarity of anything behind that beam of light.
Example of Headlight Compensation:
E. Exposure Control for IR Light
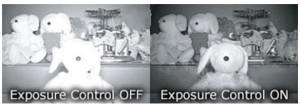
Exposure control for IR (Infrared) light is a pretty simple feature to explain. Many security cameras now come equipped with IR LEDs. These LEDs will light up when the light sensor realizes that it’s getting too dark for the camera to see. Infrared light isn’t visible to the human eye, but security cameras can pick it up with no problem. Sometimes cameras are installed to close to the object they are trying to capture and the IR light will be too bright and bounce off the items causing them to be overexposed. This exposure control will reduce the overexposure and make the whole image a bit gentler and easier to see its details.
Example of IR Exposure Control:
F. WDR
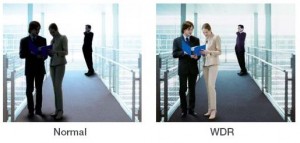
WDR stands for Wide Dynamic Range. This may be one of the most widely used and asked about feature in the security camera industry when discussing OSD settings. Wide Dynamic Range will digitally adjust the exposure of an image and helps maintain the best detail in both the areas with a lot of shadows and brightly lit sections of the video. When you have an images that vary in intensity of illumination, wide dynamic rage is the perfect setting to enable for in order to enhance the image your camera is capturing. One of the major differences between WDR and ATR is that WDR will take multiple frames under different contrasts and brightness’s and then combining them to take the best part of each frame and create one frame with a detailed image that has neutral lighting. ATR will compensate the contrasts and brightness and digitally enhance the sections of shadows and light in order to provide a better image.
Example of Wide Dynamic Range:
 G. White Balance
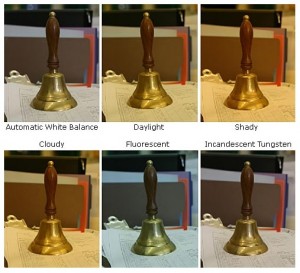
White balance is usually used to restore the original color of the scene that’s being shot with your security camera. Using white balance will ensure that anything which looks white to the human eye will remain that way when recorded on your digital video recorder. The type of lighting and atmosphere in a location can affect the way that white looks to the surveillance camera. Incandescent light bulbs, Halogen, Florescent, and even the Sun can produce different wavelengths which will affect how the chips in the cameras see the color of white. Some cameras will even have the option for AWB which is Automatic White Balancing. It will automatically fix items which may become discolored due to different types of light wavelengths. Some cameras will also have a feature labeled as ATW, or Auto Tracing White which is similar to white balancing. It will automatically adjust color in order to always achieve which is consistent in the white areas of each frame that’s digitized by the DSP.
Example of White Balancing:
H. BLC
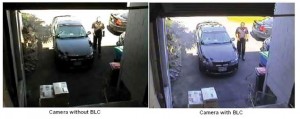
BLC, or Back Light Compensation, will increase the exposure in your video. A lot of times you’ll have an image that looks way too dim because of the way the light in the background is shining through. When you enable the BLC feature, your camera will begin to compensate for all of the bright back lighting causing your image to look a lot dimmer than it actually should. One of the downsides to BLC is when you’re shooting an object that is too small in comparison to the bright light behind it. Sometimes this can get confused and not work properly. The best use for BLC is when you have a camera pointed at a doorway. When someone walks through that door, the camera will try to compensate for the light shining through and without it, you’ll notice that the person becomes a silhouette and all of their detail is lost in the shadow. The best way to be able to identify that person is to enable this feature so it’ll properly compensate the lighting when needed.
Example of Back Light Compensation:
J. Slow Shutter
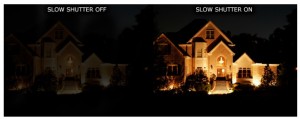
Slow Shutter is an option in your OSD which will allow you to adjust your cameras shutter speed to a slower than normal speed. The benefit to doing this is that in low light situations your camera will be able to pick up more light into the sensor, thus capturing a brighter image. The downside is that by slowing down the shutter you will get motion blur so this feature is not useful in an area with a lot of motion.
Example of an image taken with a slow shutter:
As you can see, there are many features in a security camera’s OSD menu. There are many more features which I have not listed in this article. If you’re looking for the best possible image from your surveillance system, I would recommend getting cameras which have integrated DSP’s which provide a feature-rich OSD menu. There are too many systems out there today which we refer to as “crime confirmation tools.” The reason for this is that these systems can easily capture what is occurring along with a date and time stamp, however, it is very
difficult to make out enough detail in the video to capture the person committing the crime. A lot of this can easily be solved by purchasing security cameras which provide you the ability to configure the on screen display features in order to get the best detailed image possible.

