

How hard is it to install PVC conduit?
A major challenge for anyone trying to install a security system at home is getting the camera power and video wire from the camera to the video recorder. Sometimes this may be as simple as stapling wires along a wall. Maybe, if you are lucky, it is as simple as just placing the wires in a drop ceiling. Other times you may not be so lucky. Utilizing pipe is commonplace in the security industry, and as such it is simple for a professional to install. However, not everyone is a professional and in today’s do-it-yourself minded world we try to figure this out on our own. I am going to give you some basics tips and tricks to help make it easy enough that you may want to try this on your own.
There are a quite a few situations where you have to use some sort of piping to protect your camera cables from the elements, not to mention the aesthetic difference it makes to have your cables less noticeable. There are also quite a few different types of pipe that someone could utilize, but for simplicity I am going to discuss the most widely used and the only type I recommend for residential use.
If you are going to install some pipe yourself, PVC conduit is the way to go. PVC stands for “poly vinyl chloride”, basically a petroleum based plastic. The pieces are attached to each other with glue known as a solvent. The solvent basically melts the plastic so the separate plastic pieces can reform and dry as one piece. This sounds dangerous, and it can be. You must, and I repeat MUST, use this solvent in a well-ventilated area. It is very hazardous to your health and can cause lung and mucus membrane irritation and even death in the right circumstances if the vapors are inhaled intensely. With that being said, please don’t be discouraged. PVC conduit is still by far the easiest choice to install. It is also manufactured to be in accordance with the National Electrical Code (NEC) and if installed properly it is waterproof. I will refer to the PVC conduit as: pipe, conduit, and PVC pipe, so for the purpose of this article, those terms are interchangeable.
What size pipe should I use?
There are two ways PVC conduit it sized. The first size is referred to as the “schedule”. Normally you will only have two choices in schedule size at your local home improvement or hardware store. Schedule 40 or schedule 80. The difference in the two is the wall thickness of the pipe. The higher the schedule number, the thicker the pipe wall thickness. Schedule 40 is plenty for most situations up to and including burial. If your situation will include constant sunlight, like on a roof or a south facing wall, you may want to consider schedule 80 for the added rigidity. PVC conduit is a plastic and as such it is affected by heat. If the pipe is exposed to a lot sun or heat it will expand and have a “warping” appearance. It may need extra retainer clips, but we will get to that later.
The second “size” issue to consider is what diameter pipe to use. PVC conduit is measured by the inner diameter of the pipe and normally can be found in ¼” increments ranging from ½” all the way up to 4” for most situations. The rule of thumb to use is whatever size you thing is big enough to pull your cable through, double that. An example would be you need to put three siamese camera wires in one pipe. I know that you can stuff three wires into a half-inch pipe, it is nearly impossible to actually do in practice. So I would say this needs a ¾” pipe to fit, so we need to double that and go with 1 ½” pipe. This sounds big, but I promise from years of experience that you can either spend a few more pennies per foot and be done with minimal effort, or get the minimum size you think might work and fight it all day and night.
Where to start:
Pipe is straight. This is only mentioned to remind you that every single that you have to turn or bend you are probably going to need a fitting for it. There are many pieces to use. Commonly you can get a 45 or 90 degree angle “sweep” bend or for a hard corner you can get what is called a “LB”
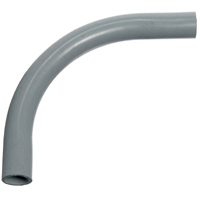
An example of a sweep 90
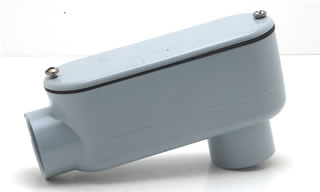
An example of a LB
These are examples of how to make turns and depending on where you shop there may be more options, but these two are the best for simple turns. The sweep is easy to use, but the LB is best especially if you have a lot of distance to pull you will need the access of the LB to aid in pulling.
Anywhere you have a camera it another place for a specific fitting. Due to camera specifics, I cant suggest the perfect option, I can only suggest what works most of the time. A simple conduit box normally will work to mount the camera on and also gives you a great place to put your camera fittings that are out of the elements. Here are a couple ideas:
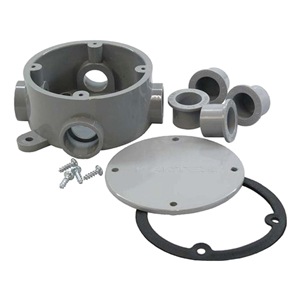
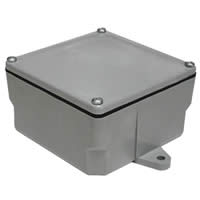
The round box is great if your piping is going to continue, as the four different holes allow not only pipe to continue, but also change directions. I have also used the box style quite often. You will need to use what suits your application.
Pipe works also need to be secured. If you are hanging it on a wall or ceiling you must screw it to the surface. PVC conduit is attached with a “clip” that is u-shaped and fits over the pipe with two holes to allow screws to hold it to the wall or ceiling. These are sold in the same section as the pipe and fittings.
Next step
Once you have installed your pipe, the fun part of actually pulling wire into it can begin. The typical way is to “fish” it. A fish-tape is a reel of either high strength nylon or steel that you feed into one side of your pipe until it gets to the other side. One the end has reached to opposite side you can tape or tie your wires on to the fish-tape and pull it back through. Voila. Now you can move on to wiring the cameras correctly and enjoying your system!
With a little bit of know-how and determination you can be on your way to your own installation. If you cannot or do not want to do this, please feel free to contact the professionals at www.securitycameraking.com and they can assist your project any way needed!