I can imagine how much of a pain it is to get into legal Marijuana growing and retail sales. This is the kind of headache a lot of people in the state of Washington are dealing with right now. There are all kinds of permits, inspections, fees, and start up costs that go into something like this and I can see how this becomes extremely stressful. Now, it is no secret that these facilities, whether it is growing or retail sales, have to have a security camera system with minimum requirements such as resolution, camera positioning, and days of recording! I know there are plenty of camera companies that you can go with and I am not here to try and explain why you should choose us, the link below will do that job for me!
Everything you need to know about I-502 Security Cameras
I am here to give you guidance on how to configure your I-502 setup and get your system running in order to pass your inspections and complete one of the major steps on your way to getting your facility operational. I work on the Tech Support team, and have had a lot of experience configuring these types of systems all over Washington. This goes for Analog systems, HDCVI systems, and even IP systems. We have done it all and are more than willing to do all the configurations for you. The first step to getting your camera system set up is by calling our sales experts and getting the system that will best benefit you. Once that is done and you receive your equipment, I need you to test every single camera before you mount it, because if you mount the camera and it is DOA the return process will become a hassle for both parties. So, testing the equipment before the install is always the best way to go!
Keep in mind, you guys have a few minimum requirements, but that does not mean that you have to go with the bare minimum. For example, 10 FPS is the minimum FPS you can configure at a minimum resolution of D1. Again, that does not mean that you have to use those settings. If you decide to go bigger and better that is fine too. If you do decide to go with a higher resolution and more FPS then you will need to buy more Hard drive space to compensate for it. You have to have 45 days of continuous recording, and the biggest thing that eats up hard drive space is FPS and resolution. The higher the resolution and FPS the more space you will need to reach the 45 day requirement. There is a calculator on our website that looks like this (Below). You will need to enter how many cameras you have, the resolution of said cameras, the FPS (aka Frame rate), hours per day you will record (24 for you), and the amount of days you need to reach! Keep in mind that this is an estimate, so you should get a bit more storage to give yourself sufficient leeway!

As you can see with the settings I put in the calculator you would need about 7-8 TBs in order to make your 45 day requirement and have some left over as leeway! So if you wanted to go with HDCVI or IP for better quality cameras that will be no problem at all.
Now that everything was tested and you have the install complete, any of our techs, including myself, can begin the configuration process with you. This article is being written to help you possibly do these configurations yourself, and better understand them at the same time! So, to start you will need to get the DVR hooked up to your network and make sure it is on the correct IP scheme so you can access it over the web, and possibly remotely after we configure the router. If you would like to configure the router on your own there is a port forwarding guide on our website under networking downloads. Before we get to that you will need to do a few things. First you want to make sure the time of the DVR is set correctly. I will do my configurations through the web as I see it to be easier. Once you get to the Web Service through the IP address, you will go to the setup tab to begin configurations. You will go to system, General, Date & Time, and make sure you change it to MM DD YYYY and 12 hour. Then you will need to set the GMT to -8:00 (Washington) and if the time does not change to the correct time, make sure you change it and you can save that page!
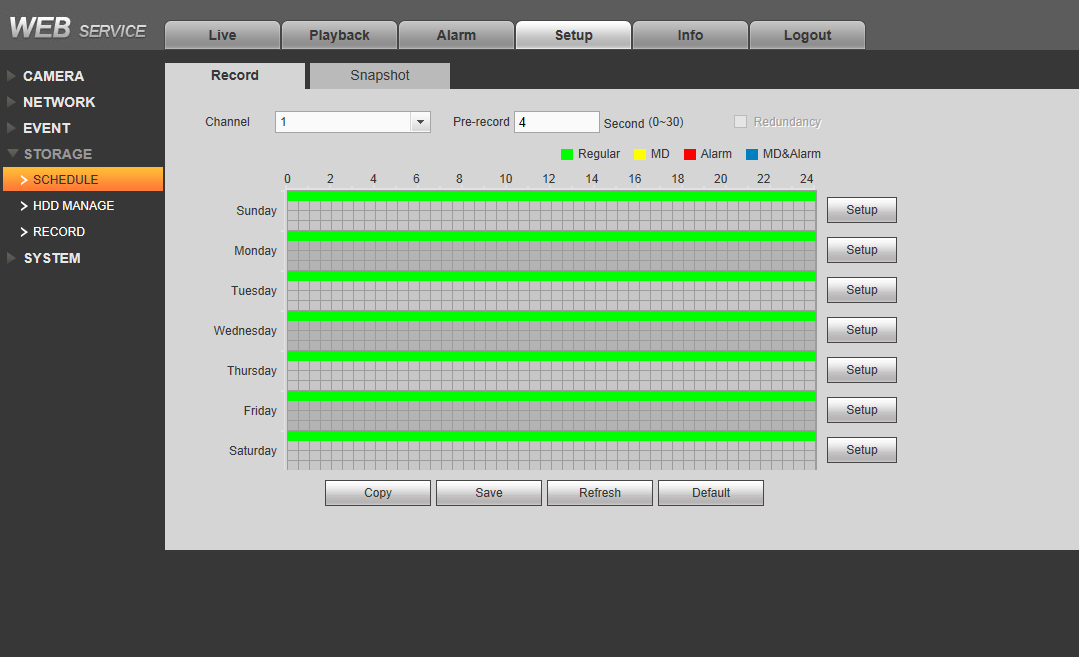
Next step is to go to the “Storage” tab and check “HDD Manage” and make sure that all of your hard drives are being recognized and are the correct size all with a status of normal. Then I will need you to go to “Schedule” and make sure you are set up for 24/7 recording on all channels for all days, and the way you will do so is look at the picture below and see on the right side where you have set up for period 1, click on that.
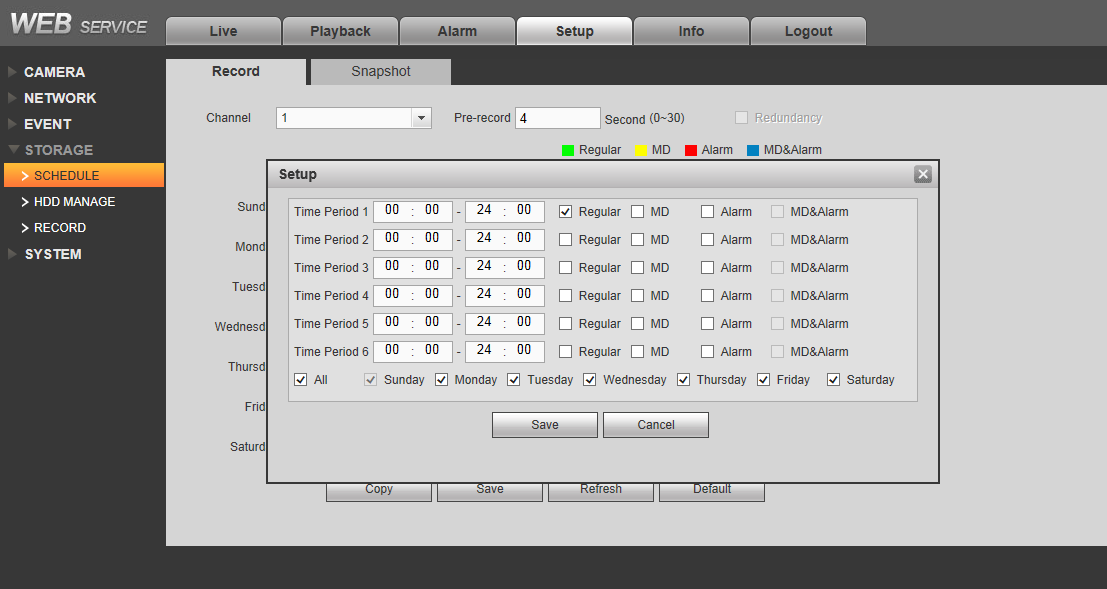
Once in that tab you will see the screen below and there you will make the exact same selections that I have there. This is setting your DVR to record 24/7 on all days for channel one. Then once you save you will see the screen above again then I want you to click on copy select copy to all channels and click save.
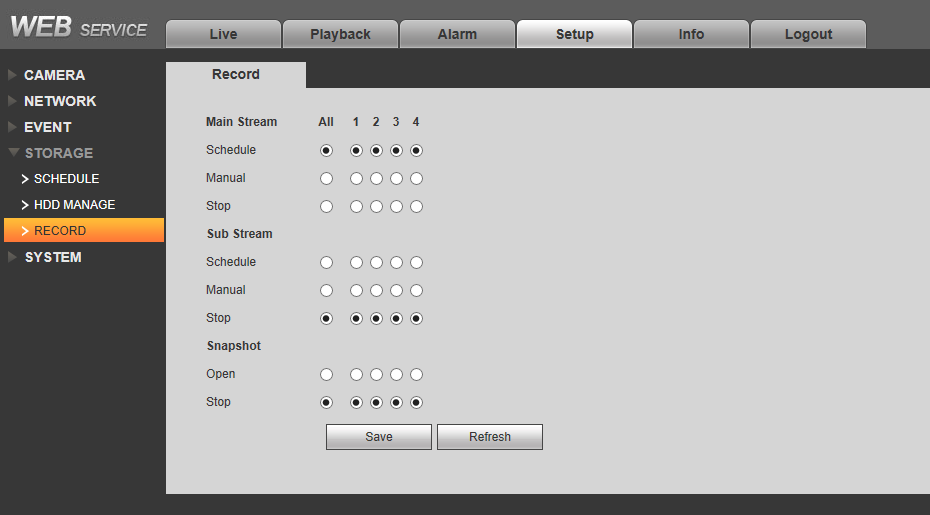
Then you will need to click on “Record” and you will see a screen that looks like the below picture. This is where you will set certain channels to record and certain channels not to record (on the main stream that is). Sub stream should be set to stop on all channels. In the main stream you want to set the channels that have cameras to “Schedule” or “Auto”, and the channels that have no cameras attached set it to stop. The way a DVR works is, it will record every single channel even if there is no camera attached. If you are pressed for hard drive space like you are to meet the 45 days, then turning channels with no cameras off will stop the recording of blank channels to preserve your space for actual footage. You just have to remember that if you add a camera you need to set it to record or you will not have any recorded footage for that channel.
The next and final step is to set up the resolutions of your cameras to make sure you get your 45 days of recording! You will do this under Camera tab and then Encode. If your cameras need to be set to D1 at 30 FPS then just set up channel 1 and then copy to all channels as a shortcut, no need to do every channel one by one. After that you are all set, although you may still need port forwarding for remote access.
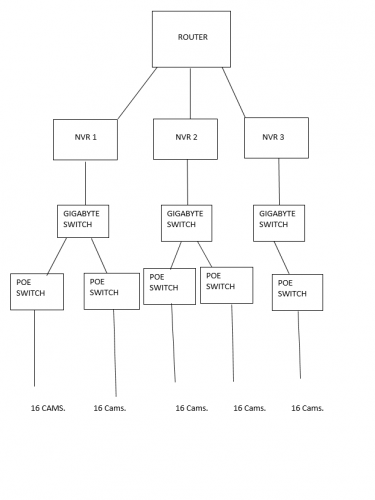
If you wanted to go with IP that is an option as well. As a matter of fact I just finished the configuration of an 80 IP camera job in Washington. The layout of the network is a bit more complicated than Analog or HDCVI where there is no network necessary for cameras. I created a little layout as to how it works and you have to have some understanding of how to configure dual NICs in the NVR, which which you can read about here!
You configure the cameras to be separated from your main network using the second NIC of the NVR. There is quite a bit of configuring that goes into that type of set up, but it is possible if you wanted to go that way. I would be more than happy to configure this type of set up for you, and so would any of the techs here in the office. Just look at the diagram I created and if you have any questions please call us at (866) 573-8878 option 3 or 124 for my personal extension. This diagram will not teach you how to configure this type of set up, but it will give you a better understanding of how to wire everything and how to set it up. Then we can walk you through the configuration on the phone! Hope all of this was helpful, Thank You! This diagram below is actually the exact set up we did on that 80 camera setup.