

ONVIF cameras are getting very popular and more of these type of cameras are able to integrate almost 100% with our NVRs. Today I will explain how to use the ELI-SIP-EMVD-21-4R ONVIF IP Dome Security Camera with an NVR-ELT4-POE4. I will demonstrate how to find the camera on the network, basic IP configuration to use with the POE NVR, and some of the settings you will need to set to record motion.
Lets start by connecting the cameras on a POE switch on your network. It is recommended that you install all the necessary tools to find the cameras on the network once they are connected.
Tools and utilities can be found in here
After one of the cameras is connected to the switch, open the search tool and select the option labeled “Device obtain an IP address automatically” option to make the camera get an IP address from the DHCP server of the router.
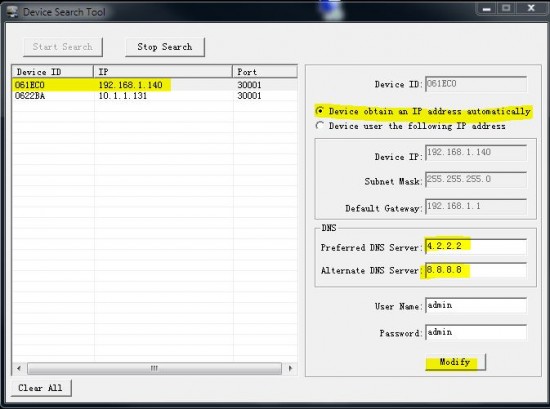
Once the camera appears in the tool, select the device ID, “Device obtain an IP address automatically” and click modify.
The next option will be to access the cameras web interface and change some settings. We will need to change the encoding, FPS (Frames per Second), bit rate and bit rate type. Below is a screenshot of what I recommend these cameras to be set at:
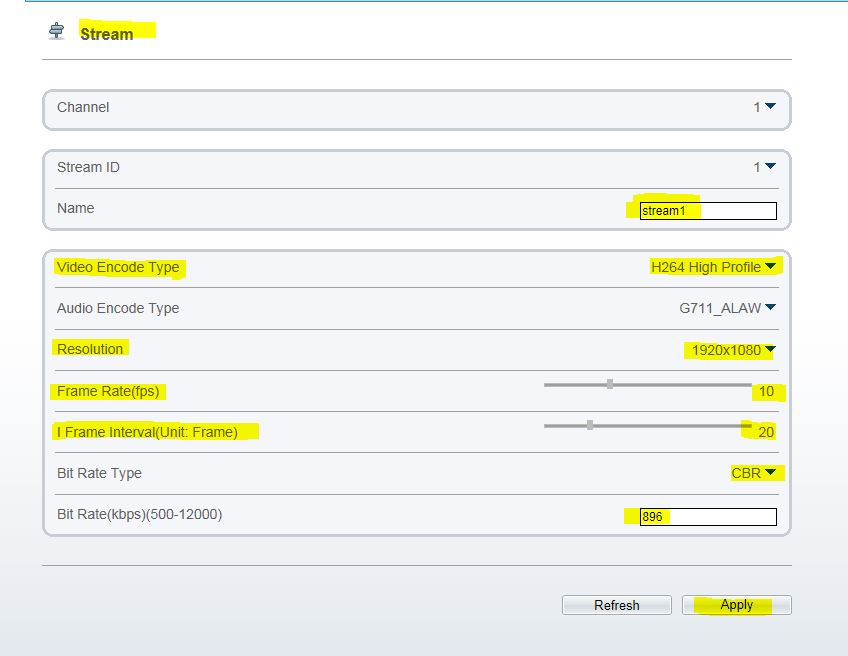
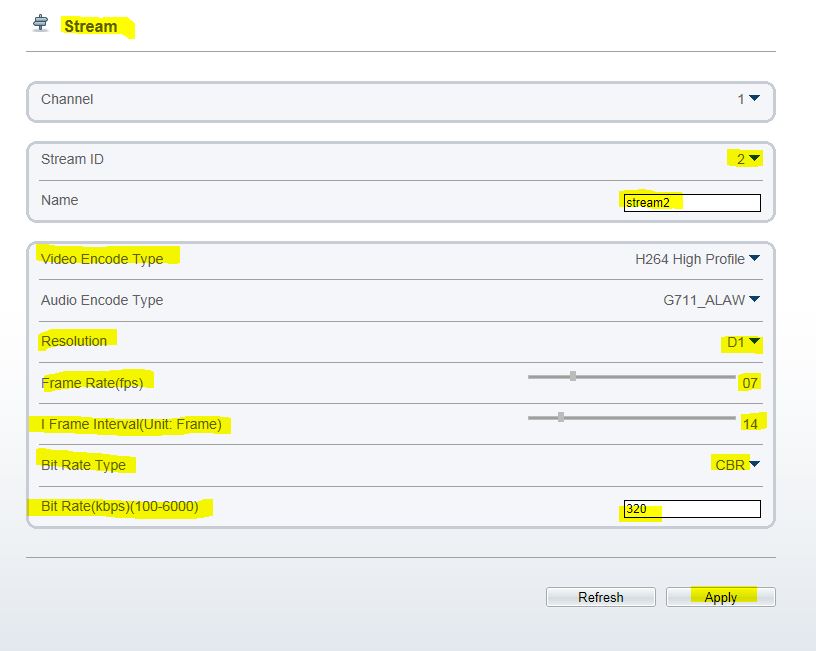
In this kind of setup, it is very important to be consistent. The key to having your network stability good at all times is to a consistent bandwidth throughout your devices. IP cameras can definitely make your network unstable if these devices are not set correctly. Some cameras can be set to use a higher amount of bandwidth when there is a lot of motion happening, as an example.
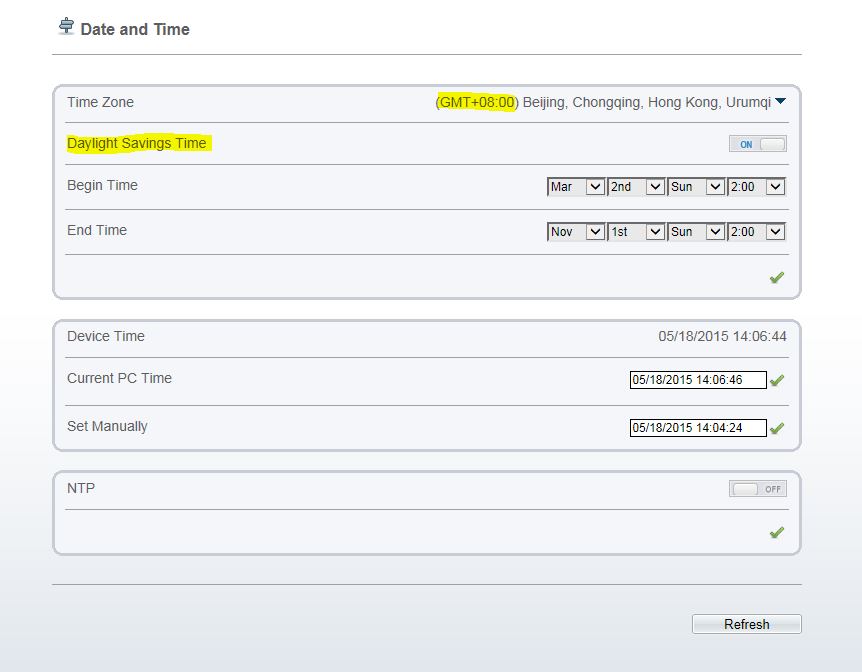
Another thing to configure in these cameras is the Time. In order to have the time in sync with the NVR, the GMT for both the camera and the NVR needs to be set to (GMT+08:00). Also, make sure that DST is set to “ON” on both the camera and NVR and the NTP is OFF. We need to make sure that after the GMT & DST has been set on both devices, the time needs to be changed manually to your current time. Save these settings and reboot the NVR.
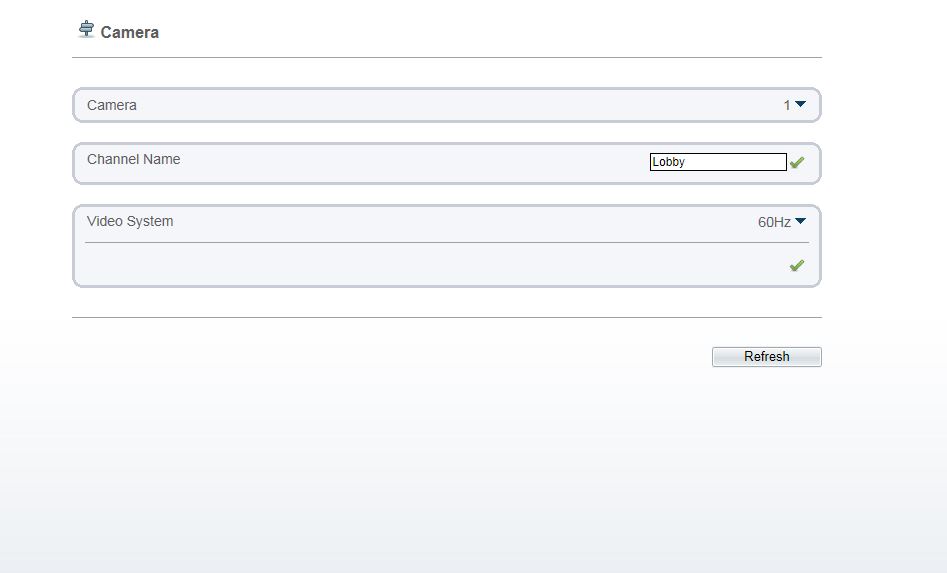
Another setting I would change is the channel name. This is not required but is just a personal preference. I like to identify my cameras based on location so they are easy to manage when pulling footage.
Our next setting to be configured is the Motion Alarm on the camera. Most likely the camera will be already configured to record motion, but just to be sure I will check the settings as follows:
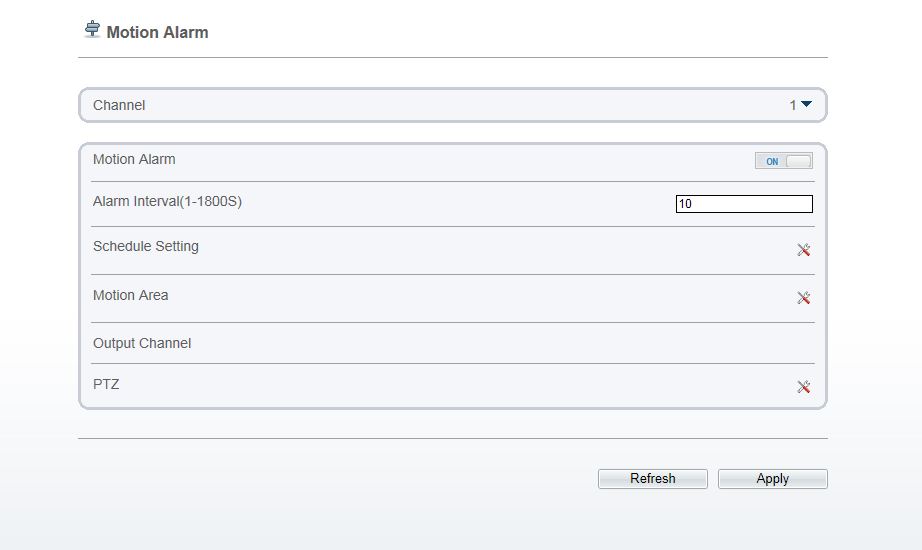
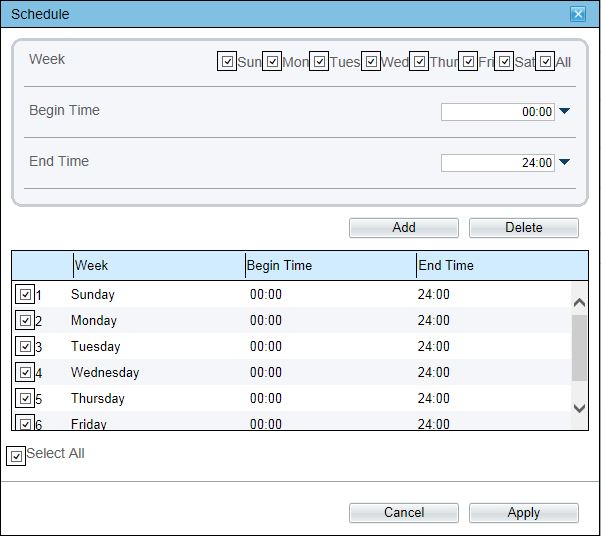
Click on the tool range icon and select all to get the days of the week selected. Select for the beginning time 00:00 and for the end time 24:00. These settings will allow you to have a period of 24H of motion recording. What this means is that the camera will have the schedule for motion alarm for a 24H period but motion recording will only occur when there is an object on from of the camera.
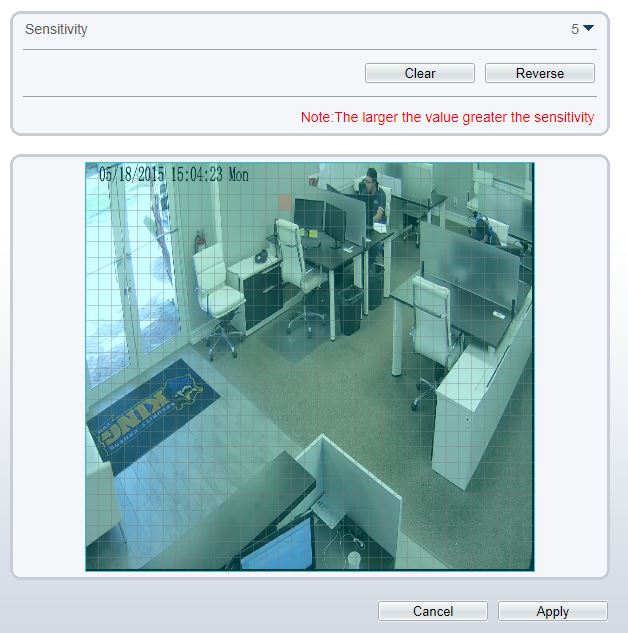
Click on “motion area” to make sure the entire region is selected. You can click on the reverse button to clear the entire area, then you can simply select different areas as you like. This particular type of setting allows you to mask shadows or any other unnecessary objects that could possibly trigger false alarms.
Now that we have configured the camera we can add the camera to the NVR. Connect the camera to the back of the NVR on port 1 of the build in POE port.
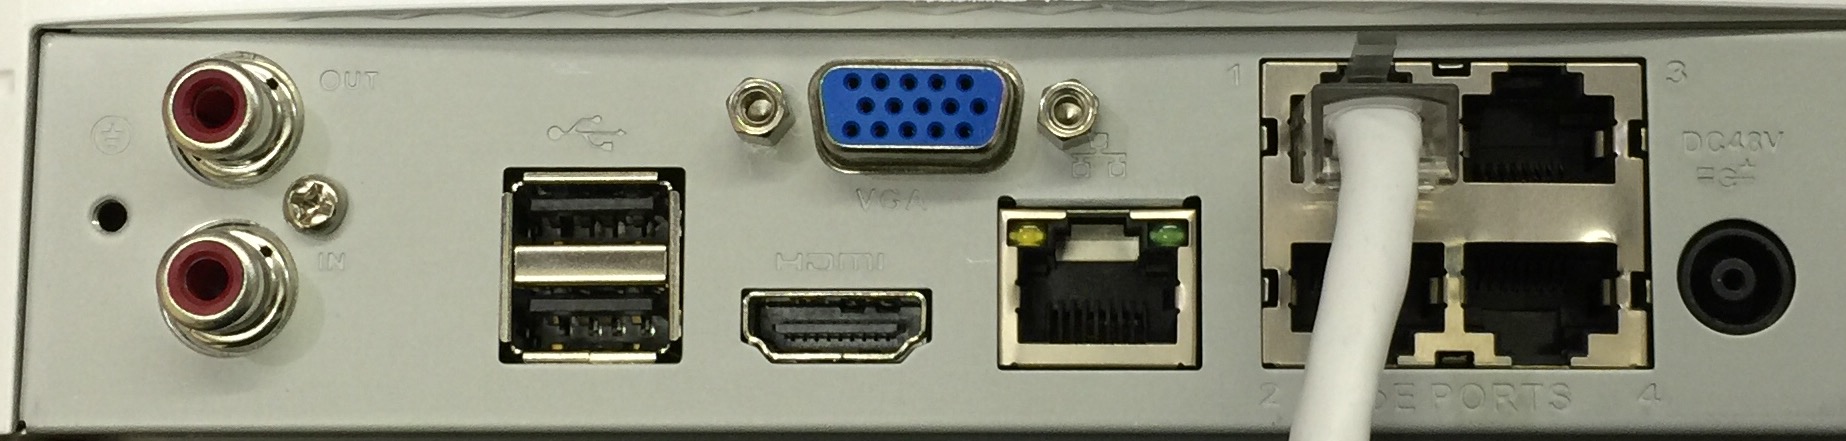
After the camera is connected, allow a few minutes for the NVR to assign an IP address to the camera. We will need to make sure that the NVR settings are correct.
The easiest way to figure what to do at this point is to connect the recorder to the power supply that comes with the unit and then connect an Ethernet cable from your router to the Ethernet port of the NVR. After the unit turns On, you will then need to go to the network settings of the NVR. Of course, you need to be connected to a monitor to see these settings.
Most of our NVRs will have a new interface, the “blue interface”, and the menus will be spread out a bit different than the previous version. At this point you will notice that there are 3 parts of this window menu: The top is operation, mid is info, and bottom is setting. Go to network and the following page will display:
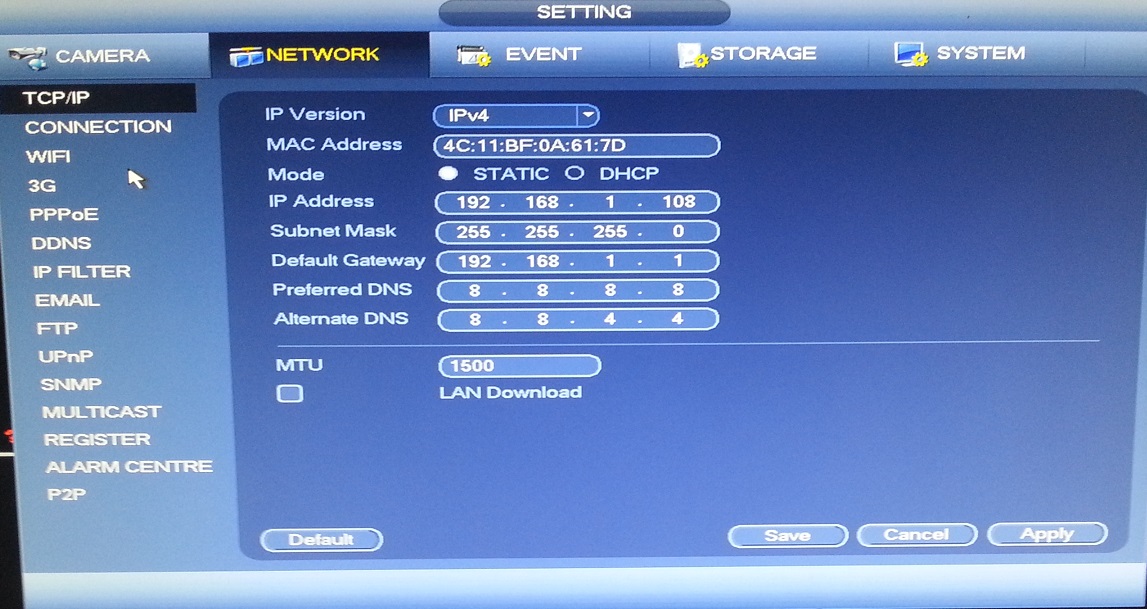
Depending on the type of NVR you have, some will have additional settings, but overall the steps are the same. We will be focusing on getting an IP address for the NVR. Click on DHCP, apply and save. You will be kicked out of that menu and in a few seconds your NVR will contact the router to get an available IP address. Go back to the network settings to see what IP address you received. Normally, what I will do is to set the IP address to a digit higher than what the NVR was assigned. This way I will avoid any IP conflicts in the network. Certain router’s DHCP settings will start from 192.168.1.100 all the way to 192.168.1.254 and it also depends on the network scheme and who configured the router initially. Assuming that the router’s scheme is within the numbers above I will set the NVR with the following IP: 192.168.1.200.
Now that I have that out of the way, the next thing to do is to configure the IP cameras address. Many times customers and installers connect all the cameras at the same time without considering that it could cause a major problem when trying to assign an IP address to the camera or even to have the cameras show up in the tool finder (IP Search). Nowadays, most of our cameras are configured as DHCP. Therefore, if you have a router in the same network as the NVR, then most likely the camera will get an IP address from the DHCP pool setup in the router as soon as it is connected to the the POE switch that they will be connected to.