What is Anti-PassBack?
Anti-PassBack is a feature in our access control software that can be used to make sure people scan in and out of your building in that order. You need to have 2 access control readers per door; one on the outside and one on the inside. When an employee comes in they will scan their card on the outside and the door opens. Then when they leave, they must scan the reader on the inside in order to get out. If they do not scan out, the card will not work on the outside reader again, and so they will not be let in. What that means is if they scan in, in the morning and do not scan out, the outdoor reader will not let them in the next time they try and scan in. You must scan in, scan out, and then they will have access granted from the outside again.
Why would I use Anti-PassBack?
The only reason why I would use Anti-PassBack is simply for tracking when employees are coming and going and how often they are coming and going. It is also useful for when you require employees to have their access control cards on them at all times. In my testing I used two users, Kuchuk and El Jeffe. If Kuchuk walks up to the door first, and before he can scan in El Jeffe says “Dude I forgot my fob at home, can you scan in and throw me your fob out the window so the cameras see me scan in?”.
Unfortunately for El Jeffe, this will not work, because the user Kuchuk scans in, throws his fob to El Jeffe and the card will not let him in a second time, unless that user scans the indoor reader to get out first, and then he will regain access from the outside.
How Do I Configure Anti-PassBack?
First thing’s first. You need to build your access control database in the software. You need to start by getting your access control board on your network and then adding it to the software. You can do so by using the tool below. This is a web service enabler which is where you change the IP address to your scheme.
Web Service Enabler –
https://www.securitycameraking.com/securityinfo/downloads/?wpdmdl=139&ind=0
Once you have done this, you can add the board into the software by choosing “Basic Config” > “Controllers” > “Search” and then add your board to the software. Once you have done that you need to add your departments by choosing the “Department” tab under Basic Config and “Add Top”. For my article I used “Article Test” as my department name. Once you have that, it is time to add users. The way I like to do this is to add them by swiping the cards, look at the top left of the software and choose “Auto Add Cards By Swiping”. When you have that up scan the first card, choose the department, and click OK. As soon as you have added the card, go to Basic Config > Personnel > and enter the name that will go with that card. make sure to do this for every card you scan so you do not get confused and be sure to label them as you go so you know which card belongs to who.
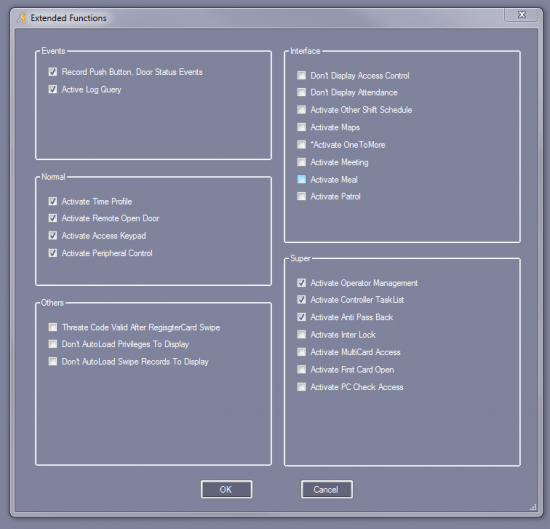
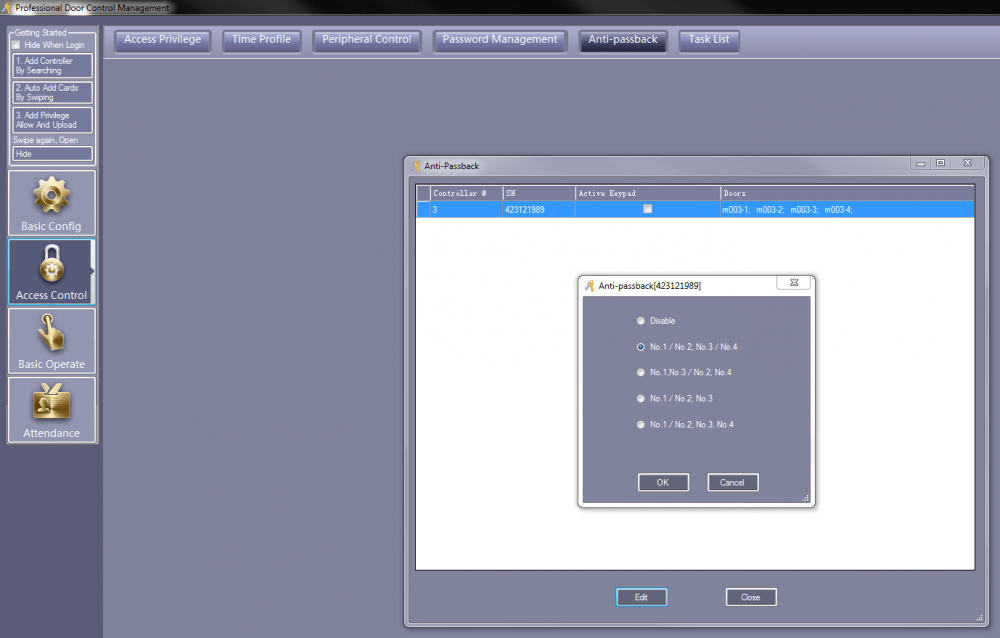
Now that all of your departments, and users have been added to the database you need to enable Anti-PassBack. At the bottom left side of the software choose “Tools” > “Extended Functions” > 5678 is the password. Look at the picture below (left) and see that “Activate Anti-PassBack” needs to be enabled. To enable it, check the box for it and click OK. The software will make you close it and reopen it, if you click yes to do so it will do it on its own and all you have to do is log in again. Now when you go into “Access Control”, you will see a new tab for Anti-PassBack. Open it up, choose your board, and click edit. I am using a 4 door board so mine looks like this, below (right). In this case I will choose No. 1 /No. 2 No. 3 / No. 4. This is showing you that readers 1 and 2 are grouped to the same door and 3 and 4 are grouped to another door.
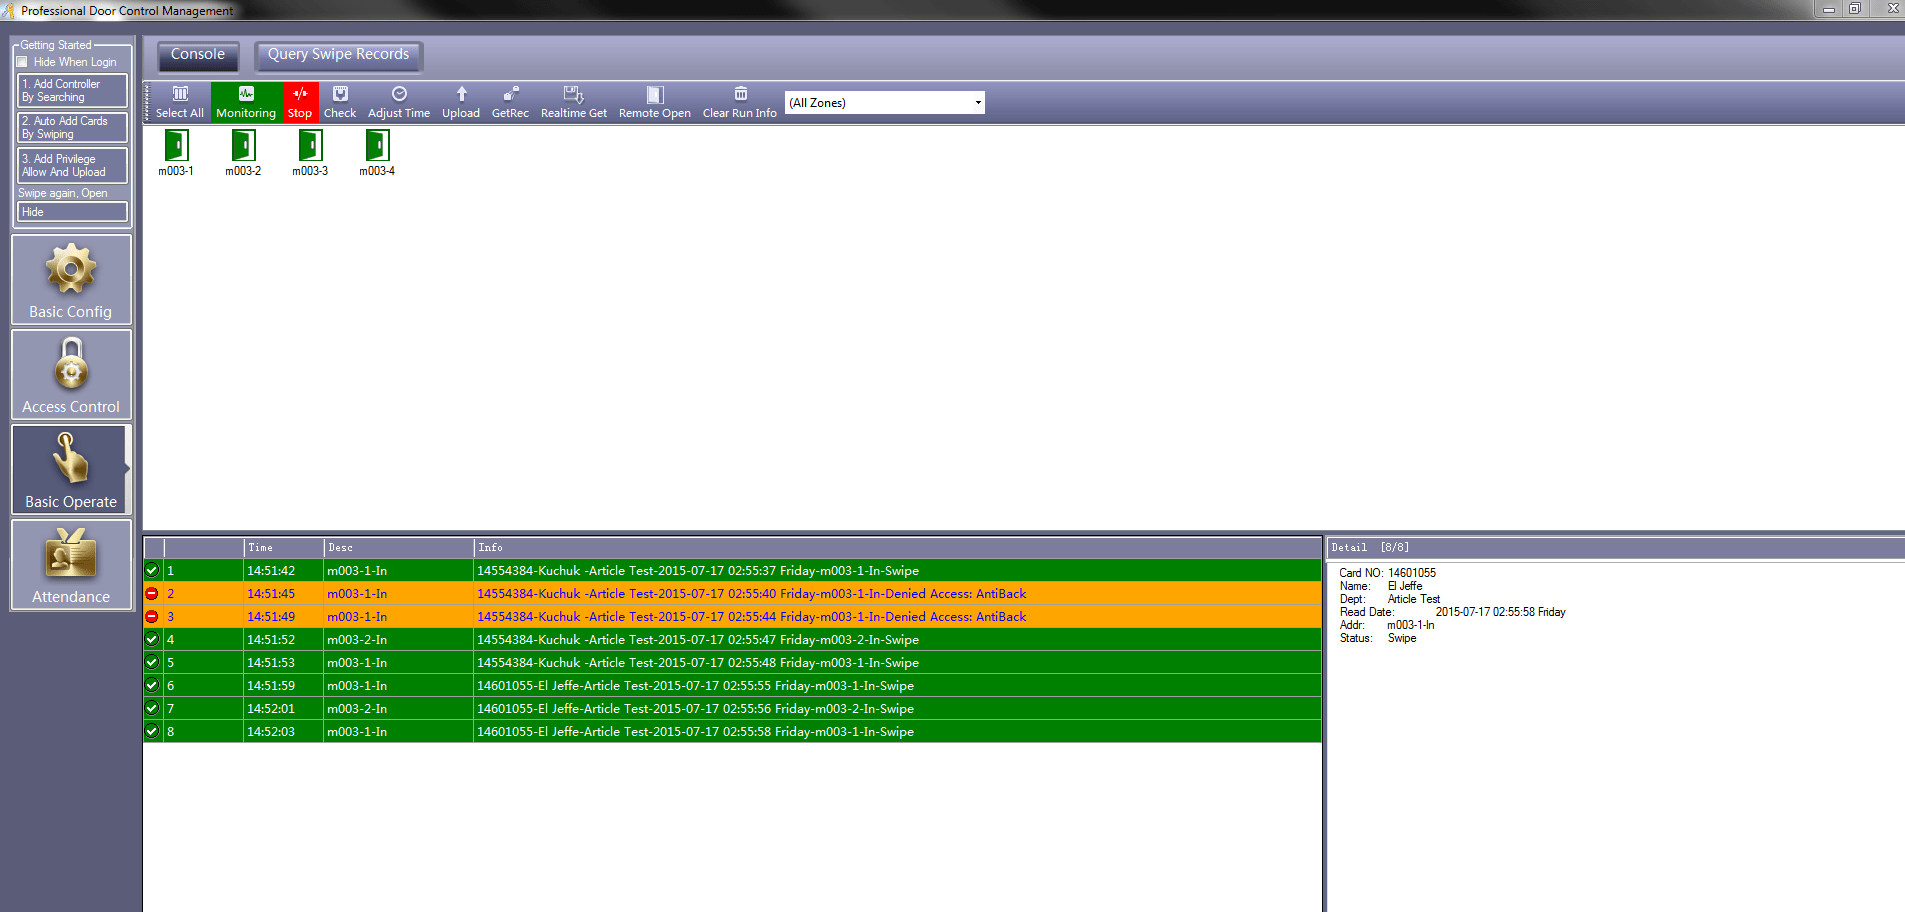
That wasn’t so hard was it? Now all there is to do is to upload it all to the board and watch it work. To upload it all to the board go to “Basic Operate” > choose “select all” > “Upload” and pres ok. It will let you know this is successful. As soon as this says it was successful you are ready to go. I will show you that it works here by monitoring the readers. I will choose select all, then monitor, and if you see the picture below you will see how it works. Notice how Kuchuk scans in, then passes his fob to El Jeffe but El Jeffe is denied access. El Jeffe then throws the fob back to Kuchuk who then scans out and back in successfully. Then you will notice that El Jeffe has learned his lesson and comes to the office tomorrow with his fob, scans in, scans out for lunch and then back in all successfully. Remember, once you have scanned in, you can not gain access from outside without scanning yourself out first.
I have to say, not too many people will have a need for this feature, but if you do feel the need to know when employees are coming and going this is the best way for you to know. If you have a guy who decides to take several smoke breaks a day to the point where it gets out of hand, he will have no choice other than to scan in and out every time he leaves the building in order to get back in. That will tell you, as the employer, how much of your time he is wasting. If for any reason at all you feel like you need some help or a clearer explanation please give us a call at (866) 573-8878. Thank You!