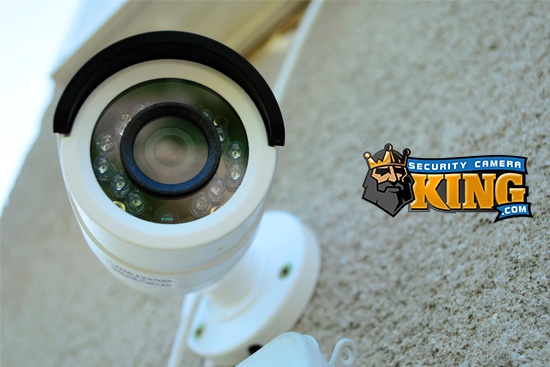
As some of you may know already we offer many different series of DVRs such as the Elite Series, Ultimate Series, etc. The specific unit I will be talking about is our 16 Channel DVR, the DVR-EL16480ME. This DVR is part of the Elite Mini Economy Series. Now, for whom streaming audio is important, there is one minor setback to this particular unit as it can only record one channel of audio. You can only enable audio on Channel 1 and no other channel. Even if you disable audio on channel 1 you cannot enable it on say Channel 2 or 3, ONLY Channel 1. If that does not deter you from this unit, there is a feature that, in my opinion, is pretty neat. You can stream audio from the unit to the TechProSS app on your phone. This way, when you want to log into your DVR from your phone, you can hear the live audio streaming to your device. If you really think about it, this set up will work on most of our DVRs. However I had a customer refer to this unit, so I will use it in my demonstration. Also, other units will be able to record/enable audio on more than one channel, depending on the DVR.
The setup I will use to demonstrate this requires a few things:
- DVR-EL16480ME
- Analog Camera
- BNC Video cable or a Plug and play cable with Audio
- 2x RCA-M-BNC-F
- 12V2A Power Supply
- Microphone
- Smart Phone w/ TechProSS App
Given that you have all the necessary equipment, you are ready to set it up and enjoy. The DVR will come with its own power supply in the box, so go ahead and get the unit booted up so you can see the display on your monitor. Next step is to plug your camera in and make sure all is operating smoothly. Remember, the camera you would like to hear the audio on needs to be on Channel 1 with this unit. I will express this again, there is no way to hear audio on any other channel than Channel 1. Once these steps are complete you are ready to hook up the cable for audio.
Let me take a second to explain that the way I am doing this is for testing purposes only. I am using about a 6 foot piece of BNC cable with two RCA-M-BNC-F connectors connected on opposite ends, converting this BNC video cable to an audio cable with RCA adapters on both ends. The ideal way I would do this is to buy the BNC plug and play cables we offer with audio wired in. You will still plug everything in the same place, just the BNC plug and play is more ideal for running cable 100’ or more. This way you don’t need to run a separate cable, it will all be wrapped into one.
Now, your microphone will have two connections on it. There is one female RCA plug and one male 12vDC plug. This is where the 12V2A power supply will come in handy in my situation. In your situation, or any situation where the plug and play is used, you will need a Y-splitter to split the power coming from the 12V power supply, one to the camera and one to the mic. For testing, I will use a separate 12V2A power supply to power the microphone.
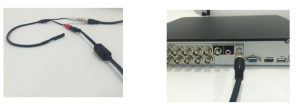
In addition, the two RCA-M-BNC-F connectors will turn the BNC video cable into an audio cable. One end plugs into the mic and the other end to the audio input of the DVR. As you see below, this is what the connection should look like with the cable going to the mic and to the audio input on the DVR. You can also see where you connect the 12V to the red connection of the mic.
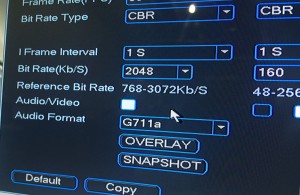
Now that all your connections are made, you are ready to set it up at the DVR itself. I will walk you through the steps to configure audio on Channel 1 first, then we will get to the app. Right-click>Main Menu>log in>Go to settings>Encode and make sure Channel 1 is selected. Then make sure that “Audio/Video” is highlighted. This is what enables the audio on Channel 1 and allows the DVR to record it. See picture below. Now that you have that selected, click “Ok” and go to the main screen where you see all 16 channels. Here at this screen you will not hear any audio, that is so you won’t be bothered by the audio all the time while you are viewing multiple cameras. Now, double-click on your Camera 1, you should hear the live audio now. There is another way, if you want to watch all 16 cameras and still hear Channel 1’s audio. Click one time on Channel 1 to select it and you should hear the audio. Thats all she wrote, it was that easy, but now lets get into the app.
First thing is first, you must download the app. I will be using the free version TechproSS Lite, although you may use either version you prefer. The difference between the two is, the free version you can not view recorded footage and you cannot set push notifications to alert your phone, whereas the version you must pay for can do these things. So once you have downloaded the app, go ahead and open it up. I am using an iPhone 5s, but it is the same for android.
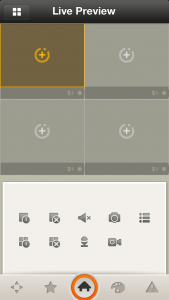
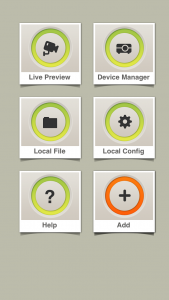
When you open the app you should see the screen above. To start, we need to add the DVR to your app. At the top left of the screen, click on the four white windows to the left of “Live Preview”. The next screen will be as shown below. Now, click “Device Manager” and that is where the list of your DVRs would be if you had any. Click Add and then Manually Add, unless you are using DDNS. This brings you to the screen where you will add the DVR/NVR. From here, name the DVR, type the IP address of the DVR, leave “Port” at 37777, “Username” admin, “Password” admin (all lower case), and very important make sure the channel amount is accurate or it will not log into your DVR. Once all the correct information is added, you may click save. Now, you will see your DVR named the way you chose under Device Manager.
Now that you have your DVR added properly you may click back to the menu above. This time you will click on Live Preview and you will see the very first screenshot I showed you of the app above. Go ahead and click the plus sign in Channel 1’s window. It will ask you to select a device, choose your DVR and then choose Channel 1. Given everything is set up properly you should see your camera in the first window. Double click on your live camera and look for the icon that looks like this (below Left). Once you have found it, click on it, it should now look like this. (Below Right).

That is all, you should now be able to hear live audio streaming to your device. You will be able to hear this audio either on the WiFi or externally. To allow this to work externally, a few things need to be done first. I will be brief on this. First, you must port forward your TCP port within your router (Port: 37777). Once that is done properly (call our tech support line 866.573.8878 they will do this for you if need be), you need to add another device under device manager in the app for the same DVR. Only thing that changes is that you must use your external IP address. Hope this article has been informative, for more help with port forwarding download our free article, “Port Forwarding 101”.