

The DVRs that we sell here at Techpro Security are user friendly and have a wide variety of features that allow you to customize them for the specific requirements of your installation. One of the more interesting features of our DVRs is that you can access them through the internet once you have them set up correctly to work with your network and get some ports forwarded. This means that you can go on vacation and still be able to log into your DVR in order to view your live camera views or recorded footage, as long as you can get to a computer with an internet connection. You can even use a smart phone for this purpose. Giving you this ability is just another way that security cameras can help bring you some peace of mind, by allowing you to always be able to view the location that meant enough to that you protected it with a security camera system.
Setting up the networking for this is a somewhat involved process that isn’t too difficult if you have some understanding port forwarding and have a little experience networking computers. Since many people don’t have a firm understanding of this, our technical support department is available for assistance and can even log into a computer with in the DVR’s network in order to help get this set up. In this article we’re going to take a closer look at this amazingly useful feature and how to set it up.
The first step in the process of getting this set up is to make sure that you have your network physically set up correctly. The basic idea is that you want to have a router connected to your modem, then have a computer and your DVR connected to that router. It is very important that you have the DVR and a computer plugged into the exact same router, at least while this is being set up. Once you have the physical set up of the DVR and network configured properly, then it’s time to make a few setting changes in the DVR.
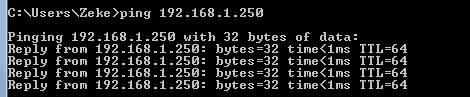
The next step in this process is to go to the computer in order to get some information about your network which will need to be entered in to the DVR so that it’s configured to work in your network. You will need to hit the windows start button and type “cmd” in the field to pull up a command prompt. In older versions of windows you might have to select run from the start menu in order to bring this field up. Once you have the command prompt window open then you’ll need to type “ipconfig” in the command prompt which will return two important pieces of information (as shown in image 1). You will need to make note of the subnet mask and default gateway for this network because you will need to modify the DVR’s network page to reflect them (main menu->setting->network). You’ll also need to make sure that the first three series of numbers in the IP address on the network page of the DVR is the same as the gateway and the last series of numbers in the IP address needs to be unique on your network. In order to make sure that the DVR’s IP address is unique it’s necessary to pull the command prompt up again and type –ping (the IP address that you want to assign to the DVR). Once you are sure that no other device in your network is using it, you can assign that IP address to the DVR (image 2 shows the command prompt response for an IP address that already has been assigned to device). While you’re on the network page you should also change the HTTP port number to 88 and before saving the setting changes you’ve made.
Image 1.
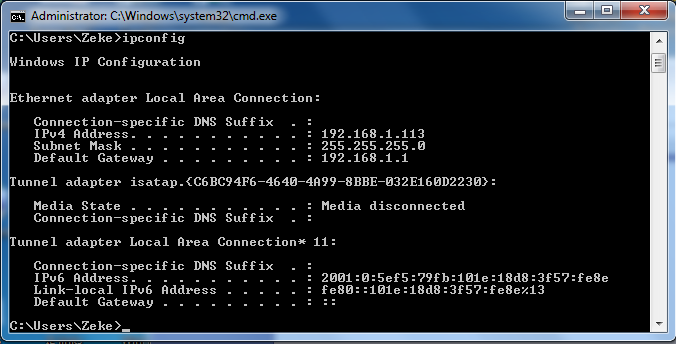
Image 2.
Now that the DVR has been set up correctly for your network, you’ll need to make some setting changes in Internet Explorer before being able to connect to your DVR. You must use IE for this function; other browsers just don’t work with it correctly. Once you have IE open you’ll need to go to tools->internet options->security tab->custom level. Once you have this menu open you’ll need to locate two settings. They are “download signed ActiveX controls” and “download unsigned ActiveX controls”. Both of these settings need to be set to prompt. Then you’ll need to confirm the setting changes. Now are you ready to connect to the DVR.
There are actually three parts to the data that you need to enter into the address bar of Internet Explorer; here’s the formula – http://(IP address):(http port #). For example – http://192.168.1.108:88. The only part of this example that will change is the IP address. If you are on a computer that is in the same network as the DVR then you will use the internal IP address (which is the one that is on the DVR’s network screen). You will need to use the external IP address if you are connecting to the DVR from a computer that’s outside the DVR’s network. We’ll discuss how to find your external IP address later in this article.
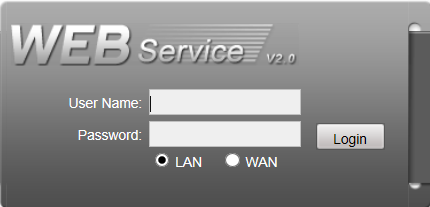
Either way once you enter the connection information, you will be prompted with a small ActiveX download. Once the download is complete you will see the log in box for the DVR interface (as shown in image 3). At this point it’s a good idea to hit the compatibility view button to avoid any display problems. It’s also a good idea to make a favorite at this point so that it’ll be easier to get to the log in interface in the future. After that you will be ready to log in to your DVR using the admin account that can be used at the DVR directly.
Image 3.
There are two ways to view the live footage from your cameras though this interface. The first and easiest way is too simply hit the button marked as ‘open all’ that is located along the left side of this page. The other way to open your cameras is to select a viewing box from the middle portion of this screen and then select a camera from the list on the left to assign the camera that you want to assign to it.
The webservice interface gives you nearly all of the functionality that you would have at the DVR directly. The features that it gives you access to include the ability to view your recorded footage by hitting the ‘search’ button and adjust almost all of the settings that you can if you’re directly at the DVR. This interface also gives you easiest way to extract your recorded footage from your DVR and get it to a computer.
In order to be able to connect to the DVR from outside the network where it’s installed, you will need to get the TCP and HTTP ports open. These ports are shown on the DVR’s network page. Once you have these ports open you should go to http://www.canyouseeme.org. This website will let you verify that these ports are unblocked and it will show you the external IP address for that network. This is the address that you will need to use in order to connect to your DVR from a different location. You will need to make the same setting changes in Internet Explorer and use the same connection formula that was outlined previously. As long as you use the external IP address in the connection formula, then you should be able to log in to the DVR at this point from anywhere.


