The following is a tutorial that will show you step by step tutorial on how to change the video output mode in the CVIPTZ-ELS2IR30X when the recorder only does TVI using RS-485. You can also follow along with the video tutorial located at the bottom of this article. For more assistance, visit Security Camera King or call 866-573-8878 for tech support.
Step One
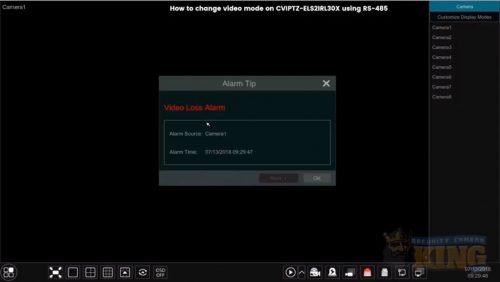
First, we are going to imagine that the recorder only does TVI. Begin by power cycling the camera which is going to tell us the address and the baud rate. The image on the screen should show pillars with different shades of grey, from white to black going left to right. This will last temporarily and afterward a popup reading “Alarm Tip” will pop up containing the address and baud rate.
Step Two
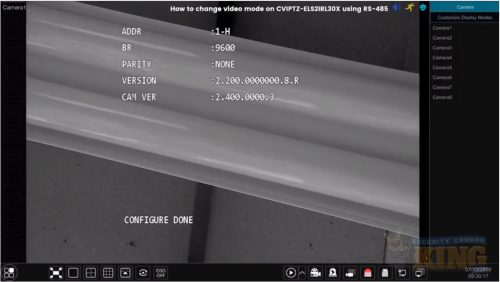
Once we have the address and baud rate we are going to use the A and B connections on our RS 45 with one end going to the recorder and the other end going to the NB RS 45 inputs on the camera. Once the camera comes back on it should display that the address which is now one and the bald rate is 9600.
Step Three
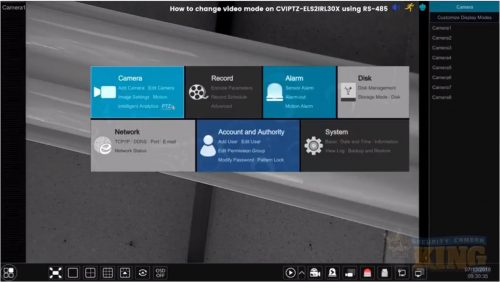
Next, we are going to change the PTZ settings. In this tutorial, we’ll be using a seatbelt recorder as the example. Go into the Settings by clicking on the tab on the lower left-hand corner. Then click on the option “Settings”. This will bring up a menu that has the following tabs: Camera, Record, Alarm, Disk, Network, Account and Authority, and System in that order. In the Camera, tab click on PTZ which will be at the bottom right corner of the tab.
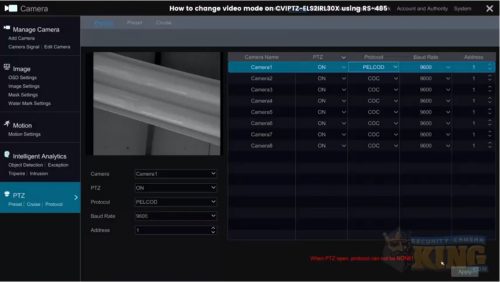
Step Four
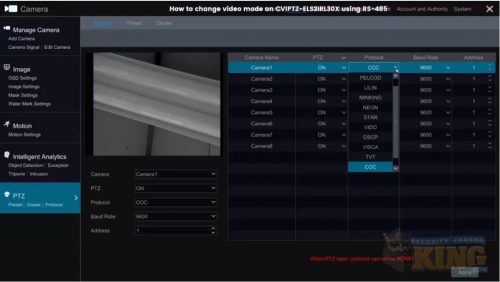
Next, we are going to change the protocol for channel one. Once we click on PTZ in the Camera tab a new window will pop up. In this menu, PTZ option will be highlighted. Beneath PTZ there will be three options: Preset, Cruise, and Protocol in that order. We are going to click on the Protocol option. This will show a list to the far right with the columns: Camera Name, PTZ, Protocol, Baud Rate, and Address from left to right. Under the Protocol column, you should see it set to COC (which stands for Control Over Coaxial).
Step Five
We want to change the COC to PELCOD in this example which is the serial RS 45 connection. Click on the Protocol tab where it reads, “COC” and select PELCOD. Below the recorder image it should read: Camera-Camera1, PTZ-ON, Protocol-PELCOD, Baud Rate-9600, and Address-1. This will confirm that we are on the correct serial settings.
Step Six
Now that we are on the correct serial settings we will exit and return back to the Main Menu. On the Main Menu, right click and select PTZ Control which will grant us control of the camera. You can control the camera by clicking on the directional buttons on the bottom right corner. Each button will control and move the camera in a specific direction. Next, we are going to explore the OSD Menu.
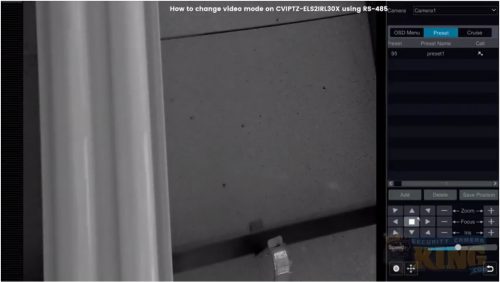
Step Seven
On the right-hand side, we are going to click on the OSD Menu. In the OSD menu, there will be a directional pad or enter menu. On a third party recorder, it may be possible that the enter menu does not work properly. In this case, you can go into the Preset menu on the right of the OSD menu. Using the example of preset1 with the preset set to 95. Click under the Call option to open up a menu with the following options: System Setting, Display Setting, Camera Setting, Function Setting, Alarm Setting, IR Light Setting, and Exit.
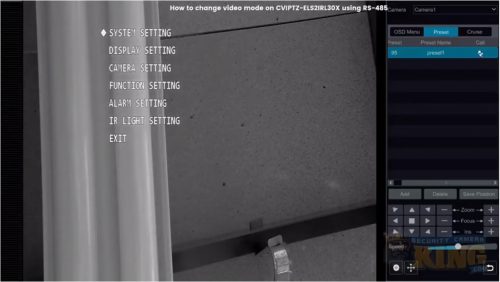
Step Eight
Using the directional buttons on the bottom right-hand corner we are going to select Iris + which acts as an Enter button to select System Setting. This will bring us to the submenu which reads: System Information, ADDR Information, Count Information, System Time Setting, Set North, Language (set to English), Video Output (set to CVI), Factory Default and Back (with Exit to its right). Using the downward directional button on the bottom right corner highlight Video Output. We are going to change it to TVI. This is done by pressing the rightward button to select TVI.
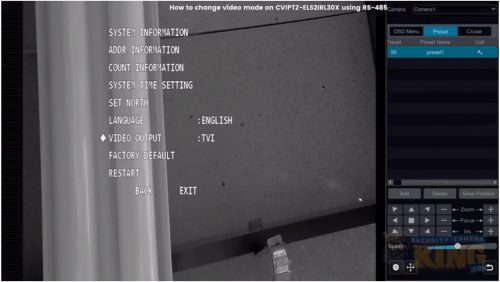
In our example, the camera also supports HD and standard definition. Once TVI is selected press on the Iris + which acts as the Enter button. This will cause the background image to shift to black for a few seconds. Once the background image comes back into view we will have full control of the RS 45. This is how to change the video output mode on this camera.
That completes this tutorial guide on how to change the video output mode on the CVIPTZ-ELS2IRL30X when the recorder only does TVI using RS-485. If you are having any problems be sure to follow along with the video tutorial provided below.
Visit the Video Vault anytime on our website to watch more video tutorial guides and new product demonstrations. Contact Security Camera King if you have any further questions or need assistance.
Facebook | Twitter | Google+ | YouTube